The Engraving feature allows you to offer engravable products that can be customized by your customers. It simulates how the design will look when engraved directly in the Customizer, providing a realistic preview for customers and automatically generating all the production files you need.
How it works
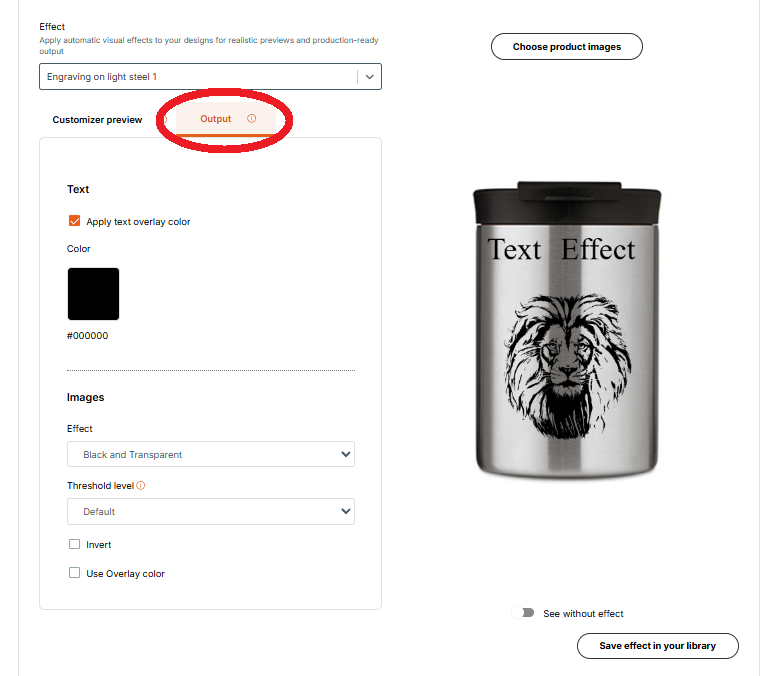
When you create a Printing Method, you enable the Engraving feature in the Effect section. You set an effect to simulate engraving on your product and the design gets that effect.
Zakeke provides you with pre-made effects that you can edit if you're not happy with the final result. In particular, an effect is composed of:
- Overlapping and opacity: this is where you choose the blend mode. Normal, Overlay and Multiply are the most common ones.
- Text color
- Automatic effect to auto-convert the images uploaded by the customer (greyscale, black and white, ...)
Please note
If you activate the 3D preview for a product with one of these effects, we
suggest setting the Blend mode to Normal
and Opacity to 100%.
Output files with Engraving enabled
When Engraving is enabled, Zakeke generates a set of production-ready files.
The output behavior follows two simple rules:
Standard print files (without the engraving effect) continue to be generated as usual: PDF, PNG, SVG, and DXF. See more here.
Engraving-ready files: additional files with the engraving effect applied are generated, identified by the
__effectsuffix in the filename.
Engraving-ready files
When Engraving is active, Zakeke generates additional engraving-ready production files in addition to the standard print-ready formats.
By default, all engraving-ready files are generated exactly as you see the design in the Customizer preview mode. However, you can choose to set different effect rules for your engraving-ready files than the ones used for the preview, from the Output tab when you configure the effect in the Printing Method.
Files generated
Zakeke produces engraving-ready versions of the standard files:
PDF_effect
Engraving version of the print-ready PDFSVG_effect
Engraving version of the SVG filePNG_effect
Engraving version of the PNG file
Regardless of settings for standard files in the Printing Method, Zakeke also generates three engraving-specific files:
AI
Adobe Illustrator vector file with engraving effectBMP
Bitmap file for engraving machines-
PDF_effect_vector
Vectorized PDF with engraving effect, optimized for productionIn addition to the standard
__effectoutput file, the__effect_vector.pdfis a vector version of the final output with the effects applied.This file is generated by an image tracing algorithm applied to the rasterized
_effectfile, so the vector result may differ slightly from the original raster effect.-
Limitations: The
__effect_vector.pdfwill not be created if:You have a dark-and-light effect plus an overlay color other than black or white, or
You have any other effect plus an overlay with a color other than black.
In total, when Engraving is active, up to 11 production files can be generated.
| # | Type | Filename example | Description | Notes |
| 1 | filename.pdf | Standard print-ready file | ||
| 2 | SVG | filename.svg | Standard vector file | |
| 3 | PNG | filename.png | Standard raster file | |
| 4 | DXF | filename.dxf | Standard CAD vector file |
|
| 5 | DXF HQ | filename__HQ.dxf | High-quality CAD vector file | |
| 6 | PDF _effect | filename__effect.pdf | Engraving version of the PDF | |
| 7 | SVG_effect | filename__effect.svg | Engraving version of the SVG | |
| 8 | PNG_effect | filename__effect.png | Engraving version of the PNG | |
| 9 | AI | filename__effect.ai | Illustrator vector file with engraving effect | |
| 10 | BMP | filename__effect.bmp | Bitmap file for engraving machines | |
| 11 | PDF _effect_vector | filename__effect_vector.pdf | Vectorized PDF with engraving effect | Created by tracing the rasterized effect into vectors. May differ slightly. |
Key details
PDF, SVG, and PNG files are produced in two versions: standard and
_effect.-
DXF files don’t support raster data. They contain only vector elements.
If you want raster elements (such as shadows or effects) to be included, enable AI Vectorizer so Zakeke converts them into vectors before exporting.Two versions of DXF are generated:
DXF
This version provides connected paths (you can select the entire shape as one object), but the overall precision and curve quality are slightly lower.DXF HQ
This version provides higher precision and smoother curves, but the paths are split into separate segments. For example, if you select a rectangle, you’ll be able to select each side individually rather than the whole shape.
AI, BMP, and PDF_effect_vector are always generated, regardless of your Printing Method settings.
The PDF_effect_vector is created using an image-tracing algorithm and may look slightly different from the preview.